Showing posts with label pattern. Show all posts

November 3, 2008

At Last - Finished Space Invaders

It's done! At long last, it's done!! I told myself no more new projects until this was finished, and there's something I REALLY REALLY want to start working on, so I forced myself to finish this stupid scarf this weekend.

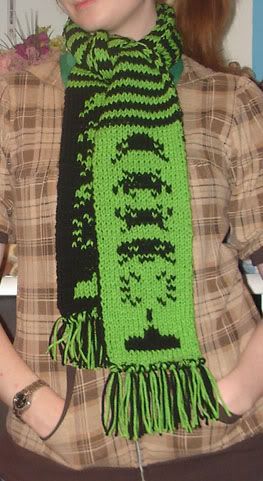
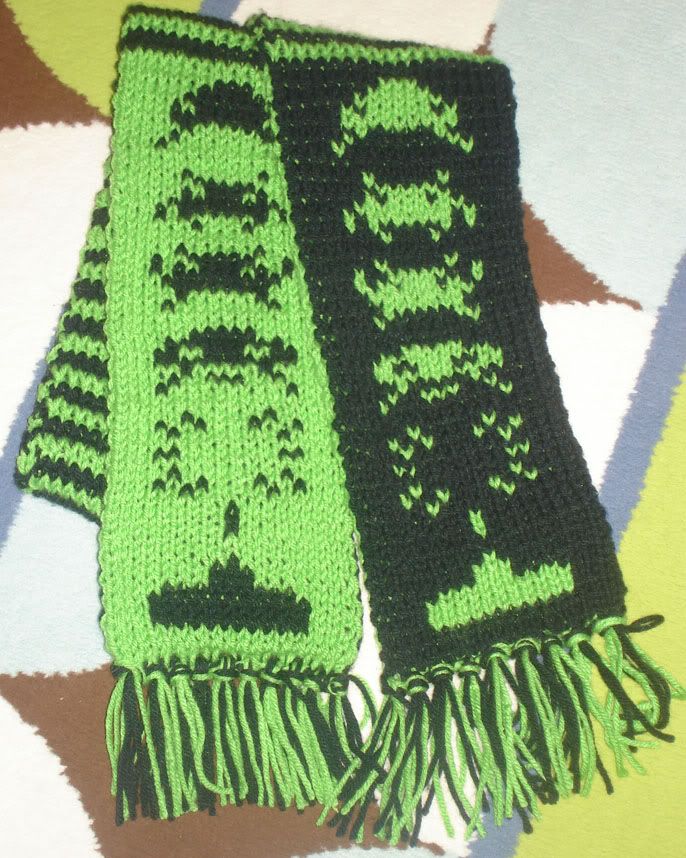
And so, at long long long long LONG last... I give you... the Space Invaders scarf.


I have uploaded and linked the chart I created for this here in my blog for you guys to use as you like. If you want to duplicate my scarf PRECISELY, this is what I did:

I used Red Heart Super Saver yarn, in black and in bright green. It takes probably half a skein of each. I knit on size 7s.
Really, you can use whatever you'd like, but I think worsted probably works best. Bulky might do all right, too.
Being that it's a scarf, gauge doesn't matter. Just knit it. Have fun. Seriously.

With BOTH YARNS held in one hand and using long-tail cast on, CO 19 stitches. This actually gives you 38 stitches - 19 green and 19 black.
For the next row, you'll start working in double-knit. (I won't go into too much detail on double-knitting because there are great tutorials out there and people who can explain it MUCH better than I can.) Knit the first stitch in green, move BOTH yarns to the front, and purl the second stitch in black. Move both yarns to the back again and keep going until you now have a row of 38 stitchs, alternating in green and black.
Work four rows of solid colour like this.
Begin working the chart, bottom-up.
When you finish the chart, again knit four solid rows of colour. Then, you need to change your colours completely to start the stripes. That is... if you're about to do a knit stitch with green and a purl with black, you'll knit with black and purl with green. Do two rows, then switch colours again.
There are a total of 63 stripes. After you've finished the last stripe, switch colours ONE last time and knit four solid rows. Then start again with the chart, going top down this time.
Finish the chart and knit four solid rows of colour again.
To bind off, again take both yarns in one hand. You will BO by doing a K2TOG instead of just straight knit stitches - put your needle through a green stitch AND a black stitch, and knit them both (holding both yarns in your hand, remember!) If you don't do it this way and just knit all 38 stitches separately, you'll end up with the BO end of your scarf bigger than the CO end!

There are other ways to CO and BO with double knitting... this is just what I did. I chose to BO holding both strands of yarn because it replicated the look of my CO. Yes, it's kind of messy... and that is why I gave my scarf fringe. (Plus I like fringe.) I took two strands of black and two strands of green for each tassel of fringe and looped them through every other stitch or so until it looked fringe-y enough.


And that's it! I'm DONE with it!
My next project is double-knit also. What can I say... I love double-knit scarves. (Or I'm just a glutton for punishment.)
Space Invaders Chart

This is the chart for my Space Invaders scarf. You can do whatever you'd like with it - put it on armwarmers, socks, a sweater... take just a few aliens, add some aliens in, whatever.
This chart is really easy for someone who's a beginner to charts because it's symmetrical... that is, you don't need to remember if you're reading the blue rows right-to-left and the white rows left-to-right or vice versa, because it all reads the same backwards and forwards anyway. So if you screw up and forget which way you're going, you won't screw up the pattern.

Space Invaders Chart


My chart is slightly different from existing charts because I wanted to make it look as if you were really playing the old game... so I sought out old reference pictures. You WILL notice that my chart is technically missing an alien graphic - that's because I included the little explosion graphic. There are five rows of aliens in the old game, and for my chart, the bottom row of aliens is being EXPLODED.
Oh - it's also missing another alien graphic... the one of the guy at the top with his legs in. All the reference pics I found for the original game just had five rows, so I didn't include that last graphic either.

That's just how I chose to do mine and why I made my own chart instead of using one of the several other options that are out there! For specifics on exactly how I did MY scarf, see this post. But you don't have to follow what I did... you can work the chart bottom-up three times, then go top-down three times on the other side. Make bigger stripes in the middle; make vertical stripes in the middle. Do boxes, hearts, the word "SPACE INVADERS" - whatever. Part of the fun of knitting is making a pattern yours... that's why this is really less "pattern" and more "just a chart."
Enjoy it.

January 19, 2008

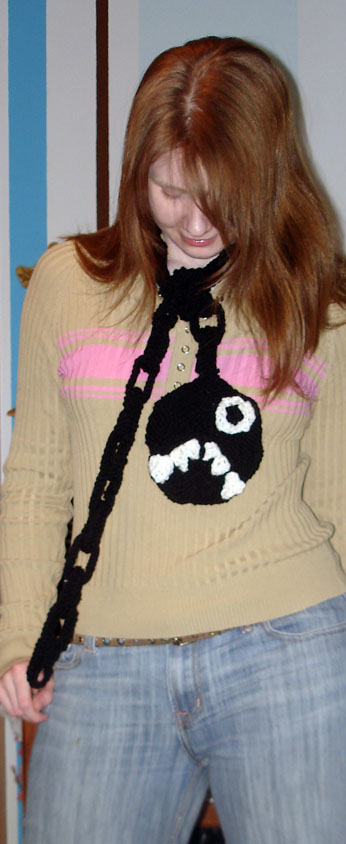
Chain Chomp Scarf Pattern

I knit up the Chain Chomp Scarf last year before the Super Bowl, and I've only now gotten around to typing up the pattern I used, since my friend knit this guy. Now you can have a Chain Chomp on your head AND your neck!

This is a little ghetto and I'm sure somebody out there who's far more talented than I am can create a different pattern with more civilized knitting techniques, but because I started knitting because I love scarves and therefore only knit scarves, and thusly only knit on straight needles (my DPKs and circs are sitting in my needle jar, unloved) this is what I did. If you're a beginner or just don't like to use DPKs, you can use this pattern.

Because Chompy was knit on straight, I had to come up with a way to create the whole thing - a circle (or several) - on straights. Think of it like a pizza, or a pie. You're knitting a triangle shaped slice of the pie, and they're all joined up. You need 7 slices of the pie to form the full circle.

You'll need:
US Size 10 Needles
A crochet hook or an embroidery needle for weaving in ends - my favourite all-purpose crochet hook happens to be pink and reads only 5.5mm on it, and that is what I used.
Two colours of yarn - for a proper Chompy, use black (MC) and white. (CC)
Note:I use Red Heart Super Saver, because not only am I cheap and allergic to a lot of wools so I'm afraid to buy the more expensive stuff, acrylic holds a nice, stiff shape fairly well, so your chains will stay pretty stiff and loopy, and your chomp head won't curl up or fold in on himself. HOWEVER, you can use whatever colours of yarn and kind of yarn you prefer... it really is up to you.
I apologize for not knowing exactly how much yarn you need, but it's not a heck of a lot. If you're using something that you don't have a lot of or are worried you won't have enough of, make SURE you knit your Chompy's head first... then if you need to skimp on extra chain links, it's not such a big deal.


Chomp Head:
In MC, CO 10.
*K1, turn. K1, turn.
K2, turn. K2, turn.
Repeat, adding 1 each time until...
K10, turn.
Last row - slip 1, K9.
Repeat from * until circle is formed (6 more times.)
Weave in ends.

Eyes: (Knit two)
In CC, CO4.
K1, turn. K1, turn.
Repeat in pattern as above; repeat into circle (3 times.)

Pupils: (Knit two)
In MC, CO3.
K2, turn. K2.
K3, turn.
BO.

Chain: I knit 25 links for my scarf, but you can make as many or as few as you'd like!
CO 21 in MC (long tail)
Work 2 rows in knit stitch.
BO.
Alt- I like to stretch mine out widthwise to make them flatter; you could also work 4 rows for wider chains.

Knit individual links, and then seam (weave in) the ends of the links through each other to get them linked up.

Big Teeth: (x4)
CO6 in CC.
K6.
K1, D1, K4.
K5.
K1, D1, K3.
K4.
K1, D1, K2.
K3.
K1, D1, K1.
K2.
K1, D1, BO.

Small Teeth: (x8)
CO4 in CC.
K4.
K1, D1, K2.
K3.
K1, D1, K1.
K2.
K1, D1, BO.


Place all your little parts (white eye, pupil, and six teeth per side - two of the big teeth on the outer edges, four small teeth making up the inner teeth) together on the Chompy head. Put them where you think they look right, and use duplicate stitch to "sew" them to the head. Try to be symmetrical, but it's not really that important - just make sure your duplicate stitching doesn't show through incorrectly on the other side! The teeth look a little funny at times, so try to use your duplicate stitches to stretch them into a real triangle shape.

Alternatively, you could just duplicate stitch teeth and eyes to the head, or make them out of felt instead!